Battery switch on travel trailer function is crucial for managing your RV’s power. This guide dives into the hows and whys of these switches, covering everything from basic operation and different system types to troubleshooting and maximizing battery life. We’ll explore the various types of switches, wiring diagrams, and safety precautions to ensure you’re confident in handling your travel trailer’s power system.
Understanding your battery switch is key to avoiding frustrating power outages and ensuring a smooth, enjoyable camping experience. We’ll cover everything from simple dual-battery setups to more complex systems, providing clear explanations and practical advice to empower you to manage your RV’s power effectively.
Battery Switch and its Role in Power Management
The battery switch is the central control point for your travel trailer’s battery power, acting as a gatekeeper to determine which systems receive power from your battery bank. Understanding its function is key to efficient power management and preventing electrical issues. It allows you to isolate the batteries for maintenance or to prevent draining them while the trailer is stored.The battery switch interacts with several key electrical components.
It’s the primary link between your batteries and the converter, which transforms 12V DC battery power into 120V AC household power. It also connects to the inverter, which performs the opposite function, converting 12V DC to 120V AC for running appliances that require AC power, such as microwaves or air conditioners. Additionally, many trailer systems, such as lights and water pumps, directly draw power from the battery bank through the switch.
Battery System Grounding
Proper grounding is absolutely critical for the safe and efficient operation of your battery system. Grounding provides a return path for the electrical current, preventing voltage buildup and potential electrical shocks. A properly grounded system ensures that all electrical components are at the same electrical potential, preventing damage to sensitive electronics and ensuring that the current flows safely through the designated paths.
A common grounding point, usually the trailer frame, is essential. All components should be connected to this point to form a complete circuit. Improper grounding can lead to poor performance, malfunctioning equipment, and even fire hazards.
Connecting a New Battery
Before connecting a new battery, always disconnect the negative (-) terminal of the existing battery to prevent accidental short circuits. Next, clean the battery terminals and connection points with a wire brush to remove corrosion. Then, securely connect the positive (+) terminal of the new battery to the positive terminal of the battery switch, followed by connecting the negative (-) terminal of the new battery to the negative terminal of the battery switch.
Ensure all connections are tight and free of corrosion. Finally, reconnect the negative (-) terminal of the existing battery. After completing the connection, check the voltage at the battery terminals to ensure proper charging and operation.
Battery Switch Configurations and Power Distribution
Different battery switch configurations influence how power is distributed. A simple on/off switch simply connects or disconnects the battery from the system. More advanced switches, such as those with multiple positions (e.g., “off,” “battery 1,” “battery 2,” “both batteries”), allow you to select which battery or batteries power the system. This is particularly useful for managing two battery banks, allowing you to use one for house functions and the other for starting the vehicle.
A switch with a “start” position can dedicate one battery solely to the vehicle’s starting system, preserving the other battery for house functions. Understanding your switch’s configuration is vital for optimizing power usage and avoiding battery drain. For example, if you have a dual battery setup with a switch that allows for individual battery selection, you could run house loads off one battery while saving the other for starting your tow vehicle.
Improving Battery Life and Performance
Keeping your travel trailer batteries in top shape is crucial for enjoying your adventures without unexpected power outages. Proper care and maintenance can significantly extend their lifespan and ensure reliable power when you need it most. This section Artikels key strategies for maximizing battery performance and longevity.Proper battery maintenance is key to extending the life of your travel trailer batteries and preventing premature failure.
Neglecting these tasks can lead to reduced capacity, poor performance, and ultimately, the need for costly replacements.
Regular Battery Maintenance
Regular inspection and cleaning are vital for optimal battery performance. Start by visually inspecting your batteries for any signs of damage, such as cracks, corrosion, or bulging. Clean the battery terminals regularly using a wire brush and baking soda solution to remove corrosion buildup. This buildup can impede the flow of electricity and reduce battery performance. After cleaning, apply a corrosion inhibitor to prevent future buildup.
So, you’re an audiophile who loves to travel? Awesome! Check out this guide on creating the perfect audiophile travel setup to ensure your listening experience stays top-notch wherever you roam. And speaking of travel, if you’re hitting the road in an RV, understanding your power system is key. Knowing how a battery switch on travel trailer function s is super important for managing your power efficiently and avoiding dead batteries – a total buzzkill on any trip!
Finally, regularly test the battery voltage using a multimeter to ensure it’s within the acceptable range for your battery type. A fully charged 12-volt battery should read around 12.6 volts. Lower readings indicate a need for charging or potential problems.
So, you’re an audiophile who loves to travel? Awesome! Check out this guide on setting up your audiophile travel setup for the best sound on the go. Knowing how to manage your power is key too, especially if you’re using a travel trailer. Understanding the battery switch on travel trailer function will help prevent dead batteries and keep your music playing.
Proper power management and a killer sound system are the perfect travel companions!
Using a Battery Tender or Trickle Charger
A battery tender, also known as a trickle charger, is a low-rate charger designed to maintain the charge of your batteries over extended periods. These chargers prevent deep discharge, a major cause of battery degradation. Even when your travel trailer isn’t in use, a battery tender helps keep your batteries topped off, ensuring they’re ready for your next adventure.
Using a battery tender is particularly beneficial during periods of inactivity, such as winter storage.
Optimizing Battery Usage, Battery switch on travel trailer function
To maximize your travel time between recharges, prioritize energy-efficient appliances and practices. Avoid running multiple high-draw appliances simultaneously, such as the air conditioner and microwave. Consider using LED lighting instead of incandescent bulbs, as LEDs consume significantly less energy. Minimize the use of power-hungry devices like hair dryers or electric heaters. When possible, utilize solar panels to supplement your battery power, reducing the load on your batteries and extending their lifespan.
Regularly monitor your battery level using a battery monitor to anticipate the need for recharging and avoid deep discharges. Deep discharging significantly shortens the lifespan of lead-acid batteries. For example, consistently running your air conditioner for hours without solar supplementation will deplete your batteries far quicker than using it sparingly and supplemented by solar energy.
Visual Representation of Battery Switch Systems

Understanding how a battery switch system works is best done visually. Let’s explore some typical setups, starting with a simple system and progressing to a more complex one. Imagine the components as parts of a puzzle, all working together to manage your trailer’s power.
A basic battery switch system usually involves two batteries: a main house battery and a starting battery. The house battery powers your appliances and lights, while the starting battery powers your vehicle’s engine. A simple switch allows you to select which battery the power from the alternator charges, or to disconnect both batteries entirely. The switch itself is a mechanical device, often a rotary switch with positions for “Both,” “Start,” “House,” and “Off.” Wires run from each battery to the switch, and from the switch to the various power-consuming components in your RV.
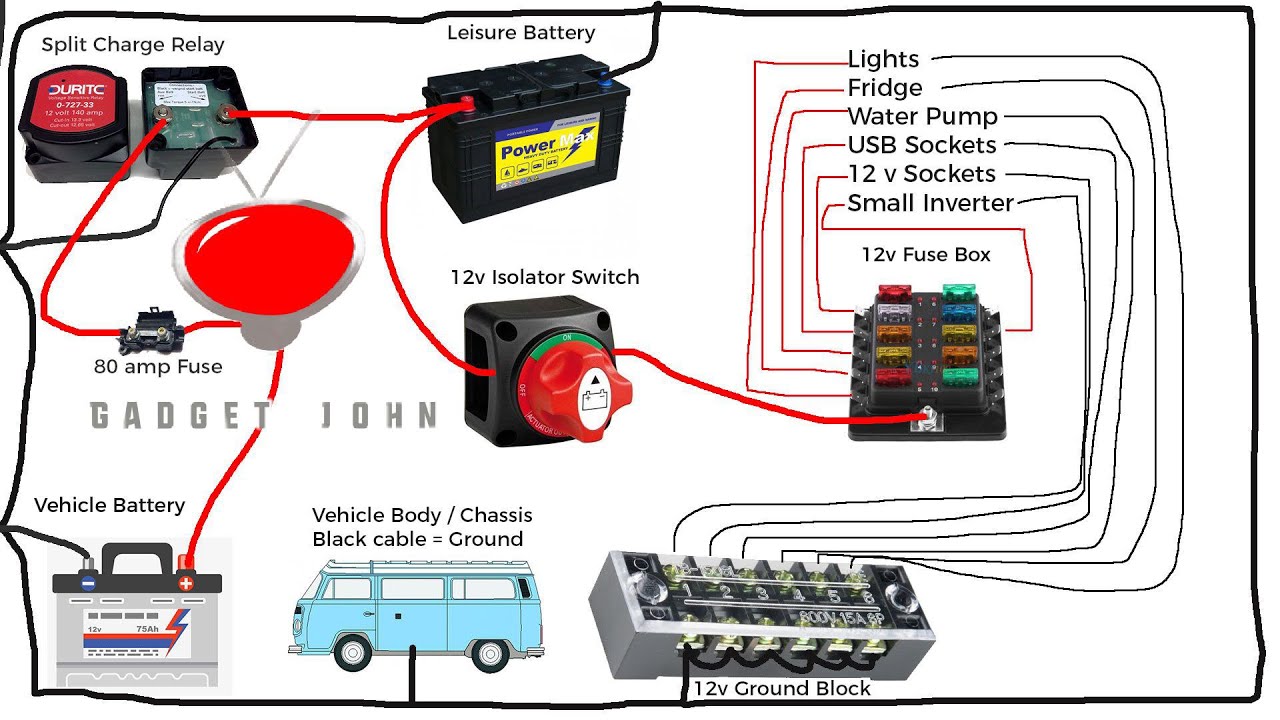
Simple Battery Switch System Diagram
Picture this: A robust, metal rotary switch sits securely mounted on a panel inside your travel trailer. Three thick, insulated cables are connected to it. One cable leads directly to your vehicle’s starting battery, marked with a clearly visible “+”. Another, similarly labeled, connects to the house battery. A third cable, usually thicker, connects to the output side of the switch and branches out to feed power to the various circuits in your RV.
When the switch is in the “Start” position, the alternator only charges the starting battery. In the “House” position, only the house battery is charged. The “Both” position allows simultaneous charging of both batteries, and “Off” completely disconnects both from the charging circuit.
Complex Battery System with Multiple Batteries and Power Sources
More elaborate setups often include multiple batteries, perhaps a deep-cycle house battery, a starting battery, and even a dedicated lithium-ion battery for sensitive electronics. These systems often incorporate a sophisticated battery management system (BMS) to monitor voltage, current, and state of charge for each battery. They might also include solar panels and a generator as additional power sources. A complex switch, or even a sophisticated electronic controller, manages the charging and distribution of power.
Imagine a larger panel, perhaps with digital displays showing battery voltage and charge levels. This panel would house a more advanced switch, possibly electronic, that allows selection of charging sources (alternator, solar, generator) and distribution to the different battery banks. Thick cables connect to each battery and power source. Additional smaller cables connect the switch or controller to various sensors and circuit breakers that monitor and protect the system.
The BMS monitors individual battery health, ensuring efficient charging and preventing overcharging or deep discharging. This setup could also include automatic charging prioritization, where the generator first charges the starting battery, then the house battery, and finally the lithium-ion battery. A low-voltage cutoff system might automatically disconnect the loads if any battery falls below a safe voltage level. This entire system works in concert to optimize power usage and battery life.
Mastering your travel trailer’s battery switch unlocks a world of reliable power, extending your adventures and minimizing downtime. By understanding the different types of systems, performing routine maintenance, and knowing how to troubleshoot common problems, you can confidently manage your RV’s power and enjoy worry-free travels. Remember to always prioritize safety when working with batteries and electrical systems.
FAQ Overview: Battery Switch On Travel Trailer Function
What happens if I accidentally leave my battery switch in the “off” position?
Leaving the switch off will disconnect your house batteries from the charging system and any connected appliances. You’ll lose power to everything running off your house batteries.
How often should I check my battery terminals?
Check your battery terminals at least every few months for corrosion. Clean them as needed with a wire brush and baking soda solution.
Can I use any type of battery in my travel trailer?
No, the type of battery (AGM, lithium, flooded) should match your system’s requirements. Using an incompatible battery can damage your system.
My battery switch is stuck. What should I do?
Try using a lubricant designed for electrical switches. If it’s still stuck, consult a professional RV technician.
